Posts Tagged 'Converting Bitmaps'

C# How to: Image Colour Average

Article purpose

This article’s intension is focussed on providing a discussion on the tasks involved in implementing Image Colour Averaging. Pixel colour averages are calculated from neighbouring pixels.

Sample source code

This article is accompanied by a sample source code Visual Studio project which is available for download .

Using the Sample Application

The sample source code associated with this article includes a based sample application. The sample application is provided with the intention of illustrating the concepts explored in this article. In addition the sample application serves as a means of testing and replicating results.

By clicking the Load Image button users are able to select input/source from the local system. On the right hand side of the screen various controls enable the user to control the implementation of colour averaging. The three labelled Red, Green and Blue relates to whether an individual colour component is to be included in calculating colour averages.

The filter intensity can be specified through selecting a filter size from the dropdown , specifying higher values will result in output images expressing more colour averaging intensity.

Additional image filter effects can be achieved through implementing colour component shifting/swapping. When colour components are shifted left the result will be:

  • Blue is set to the original value of the Red component.
  • Red is set to the original value of the Green component.
  • Green is set to the original value of the Blue component.

When colour components are shifted right the result will be:

  • Red is set to the original value of the Blue component
  • Blue is set to the original value of the Green component
  • Green is set to the original value of the Red Component

Resulting can be saved by the user to the local file system by clicking the Save Image button. The following image is a screenshot of the Image Colour Average sample application in action:

Image Colour Average Sample Application

Averaging Colours

In this article and the accompanying sample source code colour averaging is implemented on a per pixel basis. An average colour value is calculated based on a pixel’s neighbouring pixels’ colour. Determining neighbouring pixels in the sample source code has been implemented in much the same method as . The major difference to is the absence of a fixed /.

Additional resulting visual effects can be achieved through various options/settings implemented whilst calculating colour averages. Additional options include being able to specify which colour component averages to implement. Furthermore colour components can be swapped/shifted around.

The sample source code implements the AverageColoursFilter , targeting the class. The extent or degree to which colour averaging will be evident in resulting can be controlled through specifying different values set to the matrixSize parameter. The matrixSize parameter in essence determines the number of neighbouring pixels involved in calculating an average colour.

The individual pixel colour components Red, Green and Blue can either be included or excluded in calculating averages. The three method boolean parameters applyBlue, applyGreen and applyRed will determine an individual colour components inclusion in averaging calculations. If a colour component is to be excluded from averaging the resulting will instead express the original source/input image’s colour component.

The intensity of a specific colour component average can be applied to another colour component by means of swapping/shifting colour components, which is indicated through the shiftType method parameter.

The following code snippet provides the implementation of the AverageColoursFilter :

public static Bitmap AverageColoursFilter(
                            this Bitmap sourceBitmap,  
                            int matrixSize,   
                            bool applyBlue = true, 
                            bool applyGreen = true, 
                            bool applyRed = true, 
                            ColorShiftType shiftType = 
                            ColorShiftType.None)  
{ 
    BitmapData sourceData =  
               sourceBitmap.LockBits(new Rectangle(0, 0, 
               sourceBitmap.Width, sourceBitmap.Height), 
               ImageLockMode.ReadOnly,  
               PixelFormat.Format32bppArgb); 

byte[] pixelBuffer = new byte[sourceData.Stride * sourceData.Height];
byte[] resultBuffer = new byte[sourceData.Stride * sourceData.Height];
Marshal.Copy(sourceData.Scan0, pixelBuffer, 0, pixelBuffer.Length);
sourceBitmap.UnlockBits(sourceData);
int filterOffset = (matrixSize - 1) / 2; int calcOffset = 0;
int byteOffset = 0;
int blue = 0; int green = 0; int red = 0;
for (int offsetY = filterOffset; offsetY < sourceBitmap.Height - filterOffset; offsetY++) { for (int offsetX = filterOffset; offsetX < sourceBitmap.Width - filterOffset; offsetX++) { byteOffset = offsetY * sourceData.Stride + offsetX * 4;
blue = 0; green = 0; red = 0;
for (int filterY = -filterOffset; filterY <= filterOffset; filterY++) { for (int filterX = -filterOffset; filterX <= filterOffset; filterX++) { calcOffset = byteOffset + (filterX * 4) + (filterY * sourceData.Stride);
blue += pixelBuffer[calcOffset]; green += pixelBuffer[calcOffset + 1]; red += pixelBuffer[calcOffset + 2]; } }
blue = blue / matrixSize; green = green / matrixSize; red = red / matrixSize;
if (applyBlue == false) { blue = pixelBuffer[byteOffset]; }
if (applyGreen == false) { green = pixelBuffer[byteOffset + 1]; }
if (applyRed == false) { red = pixelBuffer[byteOffset + 2]; }
if (shiftType == ColorShiftType.None) { resultBuffer[byteOffset] = (byte)blue; resultBuffer[byteOffset + 1] = (byte)green; resultBuffer[byteOffset + 2] = (byte)red; resultBuffer[byteOffset + 3] = 255; } else if (shiftType == ColorShiftType.ShiftLeft) { resultBuffer[byteOffset] = (byte)green; resultBuffer[byteOffset + 1] = (byte)red; resultBuffer[byteOffset + 2] = (byte)blue; resultBuffer[byteOffset + 3] = 255; } else if (shiftType == ColorShiftType.ShiftRight) { resultBuffer[byteOffset] = (byte)red; resultBuffer[byteOffset + 1] = (byte)blue; resultBuffer[byteOffset + 2] = (byte)green; resultBuffer[byteOffset + 3] = 255; } } }
Bitmap resultBitmap = new Bitmap(sourceBitmap.Width, sourceBitmap.Height);
BitmapData resultData = resultBitmap.LockBits(new Rectangle(0, 0, resultBitmap.Width, resultBitmap.Height), ImageLockMode.WriteOnly, PixelFormat.Format32bppArgb);
Marshal.Copy(resultBuffer, 0, resultData.Scan0, resultBuffer.Length);
resultBitmap.UnlockBits(resultData);
return resultBitmap; }

The definition of the ColorShiftType :

public enum ColorShiftType  
{
    None, 
    ShiftLeft, 
    ShiftRight 
}

Sample

The original image used in generating the sample images that form part of this article, has been licensed under the Attribution-Share Alike , , and license. The can be from .

Original Image

Rose_Amber_Flush_20070601

Colour Average Blue Size 11

Colour Average Blue Size 11

Colour Average Blue Size 11 Shift Left

Colour Average Blue Size 11 Shift Left

Colour Average Blue Size 11 Shift Right

Colour Average Blue Size 11 Shift Right

Colour Average Green Size 11 Shift Right

Colour Average Green Size 11 Shift Right

Colour Average Green, Blue Size 11

Colour Average Green, Blue Size 11

Colour Average Green, Blue Size 11 Shift Left

Colour Average Green, Blue Size 11 Shift Left

Colour Average Green, Blue Size 11 Shift Right

Colour Average Green, Blue Size 11 Shift Right

Colour Average Red Size 11

Colour Average Red Size 11

Colour Average Red Size 11 Shift Left

Colour Average Red Size 11 Shift Left

Colour Average Red, Blue Size 11

Colour Average Red, Blue Size 11

Colour Average Red, Blue Size 11 Shift Left

Colour Average Red, Blue Size 11 Shift Left

Colour Average Red, Green Size 11

Colour Average Red, Green Size 11

Colour Average Red, Green Size 11 Shift Left

Colour Average Red, Green Size 11 Shift Left

Colour Average Red, Green Size 11 Shift Right

Colour Average Red, Green Size 11 Shift Right

Colour Average Red, Green, Blue Size 11

Colour Average Red, Green, Blue Size 11

Colour Average Red, Green, Blue Size 11 Shift Left

Colour Average Red, Green, Blue Size 11 Shift Left

Colour Average Red, Green, Blue Size 11 Shift Right

Colour Average Red, Green, Blue Size 11 Shift Right

Related Articles and Feedback

Feedback and questions are always encouraged. If you know of an alternative implementation or have ideas on a more efficient implementation please share in the comments section.

I’ve published a number of articles related to imaging and images of which you can find URL links here:

C# How to: Image Arithmetic

Article Purpose

The objective of this article is to illustrate Arithmetic being implemented when blending/combining two separate into a single result . The types of Image Arithmetic discussed are: Average, Add, SubtractLeft, SubtractRight, Difference, Multiply, Min, Max and Amplitude.

I created the following by implementing Image Arithmetic using as input a photo of a friend’s ear and a photograph taken at a live concert performance by The Red Hot Chili Peppers.

The-RHCP-Sound_Scaled

Sample source code

This article is accompanied by a sample source code Visual Studio project which is available for download here.

Download15

Using the Sample Application

The Sample source code accompanying this article includes a Sample Application developed on a platform. The Sample Application is indented to provide an implementation of the various types of Image Arithmetic explored in this article.

The Image Arithmetic sample application allows the user to select two source/input from the local file system. The user interface defines a ComboBox dropdown populated with entries relating to types of Image Arithmetic.

The following is a screenshot taken whilst creating the “Red Hot Chili Peppers Concert – Side profile Ear” blended illustrated in the first shown in this article. Notice the stark contrast when comparing the source/input preview . Implementing Image Arithmetic allows us to create a smoothly blended result :

ImageArithmetic_SampleApplication

Newly created can be saved to the local file system by clicking the ‘Save Image’ button.

Image Arithmetic

In simple terms Image Arithmetic involves the process of performing calculations on two ’ corresponding pixel colour components. The values resulting from performing calculations represent a single which is combination of the two original source/input . The extent to which a source/input will be represented in the resulting is dependent on the type of Image Arithmetic employed.

The ArithmeticBlend Extension method

In this article Image Arithmetic has been implemented as a single targeting the class. The ArithmeticBlend expects as parameters two source/input objects and a value indicating the type of Image Arithmetic to perform.

The ColorCalculationType defines an value for each type of Image Arithmetic supported. The definition as follows:

public enum ColorCalculationType 
{ 
   Average, 
   Add, 
   SubtractLeft, 
   SubtractRight, 
   Difference, 
   Multiply, 
   Min, 
   Max, 
   Amplitude 
}

It is only within the ArithmeticBlend that we perform Image Arithmetic. This method accesses the underlying pixel data of each sample and creates copies stored in arrays. Each element within the array data buffer represents a single colour component, either Alpha, Red, Green or Blue.

The following code snippet details the implementation of the ArithmeticBlend :

 public static Bitmap ArithmeticBlend(this Bitmap sourceBitmap, Bitmap blendBitmap,  
                                 ColorCalculator.ColorCalculationType calculationType) 
{ 
    BitmapData sourceData = sourceBitmap.LockBits(new Rectangle (0, 0, 
                            sourceBitmap.Width, sourceBitmap.Height), 
                            ImageLockMode.ReadOnly, PixelFormat.Format32bppArgb); 

byte[] pixelBuffer = new byte[sourceData.Stride * sourceData.Height]; Marshal.Copy(sourceData.Scan0, pixelBuffer, 0, pixelBuffer.Length); sourceBitmap.UnlockBits(sourceData);
BitmapData blendData = blendBitmap.LockBits(new Rectangle (0, 0, blendBitmap.Width, blendBitmap.Height), ImageLockMode.ReadOnly, PixelFormat.Format32bppArgb);
byte[] blendBuffer = new byte [blendData.Stride * blendData.Height]; Marshal.Copy(blendData.Scan0, blendBuffer, 0, blendBuffer.Length); blendBitmap.UnlockBits(blendData);
for (int k = 0; (k + 4 < pixelBuffer.Length) && (k + 4 < blendBuffer.Length); k += 4) { pixelBuffer[k] = ColorCalculator.Calculate(pixelBuffer[k], blendBuffer[k], calculationType);
pixelBuffer[k + 1] = ColorCalculator.Calculate(pixelBuffer[k + 1], blendBuffer[k + 1], calculationType);
pixelBuffer[k + 2] = ColorCalculator.Calculate(pixelBuffer[k + 2], blendBuffer[k + 2], calculationType); }
Bitmap resultBitmap = new Bitmap(sourceBitmap.Width, sourceBitmap.Height);
BitmapData resultData = resultBitmap.LockBits(new Rectangle (0, 0, resultBitmap.Width, resultBitmap.Height), ImageLockMode.WriteOnly, PixelFormat.Format32bppArgb);
Marshal.Copy(pixelBuffer, 0, resultData.Scan0, pixelBuffer.Length); resultBitmap.UnlockBits(resultData);
return resultBitmap; }

We access and copy the underlying pixel data of each input by making use of the method and also the method.

The method iterates both array data buffers simultaneously, having set the for loop condition to regard the array size of both arrays. Scenarios where array data buffers will differ in size occurs when the source specified are not equal in terms of size dimensions.

Notice how each iteration increments the loop counter by a factor of four allowing us to treat each iteration as a complete pixel value. Remember that each data buffer element represents an individual colour component. Every four elements represents a single pixel consisting of the components: Alpha, Red, Green and Blue

Take Note: The ordering of colour components are the exact opposite of the expected order. Each pixel’s colour components are ordered: Blue, Green, Red, Alpha. Since we are iterating an entire pixel with each iteration the for loop counter value will always equate to an element index representing the Blue colour component. In order to access the Red and Green colour components we simply add the values one and two respectively to the for loop counter value, depending on whether accessing the Green or Red colour components.

The task of performing the actual arithmetic has been encapsulated within the static Calculate method, a public member of the static class ColorCalculator. The Calculate method is more detail in the following section of this article.

The final task performed by the ArithmeticBlend method involves creating a new instance of the class which is then updated/populated using the resulting array data buffer previously modified.

The ColorCalculator.Calculate method

The algorithms implemented in Image Arithmetic are encapsulated within the ColorCalculator.Calculate method. When implementing this method no knowledge of the technical implementation details are required. The parameters required are two values each representing a single colour component, one from each source . The only other required parameter is an value of type ColorCalculationType which will indicate which type of Image Arithmetic should be implemented using the parameters as operands.

The following code snippet details the full implementation of the ColorCalculator.Calculate method:

 public static byte Calculate(byte color1, byte color2, 
                   ColorCalculationType calculationType) 
{ 
    byte resultValue = 0; 
    int intResult = 0; 

if (calculationType == ColorCalculationType.Add) { intResult = color1 + color2; } else if (calculationType == ColorCalculationType.Average) { intResult = (color1 + color2) / 2; } else if (calculationType == ColorCalculationType.SubtractLeft) { intResult = color1 - color2; } else if (calculationType == ColorCalculationType.SubtractRight) { intResult = color2 - color1; } else if (calculationType == ColorCalculationType.Difference) { intResult = Math.Abs(color1 - color2); } else if (calculationType == ColorCalculationType.Multiply) { intResult = (int)((color1 / 255.0 * color2 / 255.0) * 255.0); } else if (calculationType == ColorCalculationType.Min) { intResult = (color1 < color2 ? color1 : color2); } else if (calculationType == ColorCalculationType.Max) { intResult = (color1 > color2 ? color1 : color2); } else if (calculationType == ColorCalculationType.Amplitude) { intResult = (int)(Math.Sqrt(color1 * color1 + color2 * color2) / Math .Sqrt(2.0)); }
if (intResult < 0) { resultValue = 0; } else if (intResult > 255) { resultValue = 255; } else { resultValue = (byte)intResult; }
return resultValue; }

The bulk of the ColorCalculator.Calculate method’s implementation is set around a series of if/else if statements evaluating the method parameter passed when the method had been invoked.

Colour component values can only range from 0 to 255 inclusive. Calculations performed might result in values which do not fall within the valid range of values. Calculated values less than zero are set to zero and values exceeding 255 are set to 255, sometimes this is referred to clamping.

The following sections of this article provides an explanation of each type of Image Arithmetic implemented.

Image Arithmetic: Add

if (calculationType == ColorCalculationType.Add)
{
    intResult = color1 + color2;
}

The Add algorithm is straightforward, simply adding together the two colour component values. In other words the resulting colour component will be set to equal the sum of both source colour component, provided the total does not exceed 255.

Sample Image

ImageArithmetic_Add

Image Arithmetic: Average

if (calculationType == ColorCalculationType.Average)
{
    intResult = (color1 + color2) / 2;
}

The Average algorithm calculates a simple average by adding together the two colour components and then dividing the result by two.

Sample Image

ImageArithmetic_Average

Image Arithmetic: SubtractLeft

if (calculationType == ColorCalculationType.SubtractLeft)
{
    intResult = color1 - color2;
}

The SubtractLeft algorithm subtracts the value of the second colour component parameter from the first colour component parameter.

Sample Image

ImageArithmetic_SubtractLeft

Image Arithmetic: SubtractRight

if (calculationType == ColorCalculationType.SubtractRight)
{
    intResult = color2 - color1;
}

The SubtractRight algorithm, in contrast to SubtractLeft, subtracts the value of the first colour component parameter from the second colour component parameter.

Sample Image

ImageArithmetic_SubtractRight

Image Arithmetic: Difference

if (calculationType == ColorCalculationType.Difference)
{
    intResult = Math.Abs(color1 - color2);
}

The Difference algorithm subtracts the value of the second colour component parameter from the first colour component parameter. By passing the result of the subtraction as a parameter to the Math.Abs method the algorithm ensures only calculating absolute/positive values. In other words calculating the difference in value between colour component parameters.

Sample Image

ImageArithmetic_Difference

Image Arithmetic: Multiply

if (calculationType == ColorCalculationType.Multiply)
{
    intResult = (int)((color1 / 255.0 * color2 / 255.0) * 255.0);
}

The Multiply algorithm divides each colour component parameter by a value of 255 and the proceeds to multiply the results of the division, the result is then further multiplied by a value of 255.

Sample Image

ImageArithmetic_Multiply

Image Arithmetic: Min

if (calculationType == ColorCalculationType.Min)
{
    intResult = (color1 < color2 ? color1 : color2);
}

The Min algorithm simply compares the two colour component parameters and returns the smallest value of the two.

Sample Image

ImageArithmetic_Min

Image Arithmetic: Max

if (calculationType == ColorCalculationType.Max)
{
    intResult = (color1 > color2 ? color1 : color2);
}

The Max algorithm, as can be expected, will produce the exact opposite result when compared to the Min algorithm. This algorithm compares the two colour component parameters and returns the larger value of the two.

Sample Image

ImageArithmetic_Max

Image Arithmetic: Amplitude

 else if (calculationType == ColorCalculationType.Amplitude) 
{ 
         intResult = (int)(Math.Sqrt(color1 * color1 +
                                     color2 * color2) /
                                     Math.Sqrt(2.0)); 
} 
  

The Amplitude algorithm calculates the amplitude of the two colour component parameters by multiplying each colour component by itself and then sums the results. The last step divides the result thus far by the square root of two.

Sample Image

ImageArithmetic_Amplitude

Related Articles

C# How to: Encoding Base64 Thumbnails

Article purpose

This details how to read files from the file system, create and then encoding to strings.

Sample source code

This is accompanied by a sample source code Visual Studio project which is available for download .

Images as Base64 strings

From :

Base64 is a group of similar encoding schemes that represent in an ASCII string format by translating it into a -64 representation. The Base64 term originates from a specific .

Base64 encoding schemes are commonly used when there is a need to encode binary data that need to be stored and transferred over media that are designed to deal with textual data. This is to ensure that the data remain intact without modification during transport. Base64 is commonly used in a number of applications including via , and storing complex data in .

From the definition quoted above the need for base64 encoding becomes more clear. From :

The base-64 digits in ascending order from zero are the uppercase characters "A" to "Z", the lowercase characters "a" to "z", the numerals "0" to "9", and the symbols "+" and "/". The valueless character, "=", is used for trailing padding.

encoding allows developers to expose binary data without potentially encountering conflicts in regards to the transfer medium. encoded binary data serves ideally when performing data transfer operations using platforms such as html, xml, email.

A common implementation of encoding can be found when transferring data. This article details how to convert/encode object to strings.

Base64 Image encoding implemented as an extension method

The code snippet listed below details the ToBase64String targeting the class.

public static string ToBase64String(this Image bmp)
{
    string base64String = string.Empty;
    MemoryStream memoryStream = null;

try { memoryStream = new MemoryStream(); bmp.Save(memoryStream, ImageFormat.Png); } catch (Exception exc) { return String.Empty; }
memoryStream.Position = 0; byte[] byteBuffer = memoryStream.ToArray();
memoryStream.Close();
base64String = Convert.ToBase64String(byteBuffer, Base64FormattingOptions.InsertLineBreaks); byteBuffer = null;
return base64String; }

The ToBase64String method writes the targeted object’s pixel data to a object using the Png . Next a array is extracted and passed to the method , which is responsible for implementing the encoding.

Creating an Image tag implementing a Base64 string

The sample source code in addition also defines an to generate html image tags to display a string encoded .

public static string ToBase64ImageTag(this Image bmp)
{
    string imgTag = string.Empty;
    string base64String = string.Empty;

base64String = bmp.ToBase64String();
imgTag = "<img src=\\"data:image/" + "png" + ";base64,"; imgTag += base64String + "\\" "; imgTag += "width=\\"" + bmp.Width.ToString() + "\\" "; imgTag += "height=\\"" + bmp.Height.ToString() + "\\" />";
return imgTag; }

The ToBase64ImageTag invokes the ToBase64String in order to retrieve encoded the data. The Html image tag has only to be slightly modified from the norm in order to accommodate encoded strings.

Creating Image thumbnails

The class conveniently provides the method , which we’ll be using to create from existing objects. The sample source code defines the method ToBase64Thumbnail, as listed below:

public static string ToBase64Thumbnail(this Image bmp, int width, int height, bool wrapImageTag)
{
    Image.GetThumbnailImageAbort callback = new Image.GetThumbnailImageAbort(ThumbnailCallback);

Image thumbnailImage = bmp.GetThumbnailImage(width, height, callback, new IntPtr());
string base64String = String.Empty;
if (wrapImageTag == true) { base64String = thumbnailImage.ToBase64ImageTag(); } else { base64String = thumbnailImage.ToBase64String(); }
thumbnailImage.Dispose();
return base64String; }
private static bool ThumbnailCallback() { return true; }

The ToBase64Thumbnail is defined as an targeting the class. The calling code is required to specify the width and height of the output and in addition whether to wrap the encoded string in an Html <img> tag.

Note the definition of ThumnailCallback, the method requires calling code to specify a callback delegate.

Based on the value of the parameter wrapImageTag, we next invoke either ToBase64ImageTag or ToBase64String, as defined/discussed earlier.

Reading Image files from the file system

The starting point in creating encoded would be to read the local file system, searching for files. The ToBase64Thumbnails method is defined as an targeting the string class. When invoking the ToBase64Thumbnails method users are expected to provide a directory path, width and height of output , whether to add Html <img> tags and which file types to process. The code snippet below details the implementation of the ToBase64Thumbnails method.

public static List<string> ToBase64Thumbnails(this string path, int width, int height, bool wrapImageTag, params string[] fileTypes)
{
    List<string> base64Thumbnails = new List<string>();

string searchFilter = String.Empty;
if (fileTypes != null) { for (int k = 0; k < fileTypes.Length; k++) { searchFilter += "*." + fileTypes[k];
if (k < fileTypes.Length - 1) { searchFilter += "|"; } } } else { searchFilter = "*.*"; }
string[] files = Directory.GetFiles(path, searchFilter);
for (int k = 0; k < files.Length; k++) { StreamReader streamReader = new StreamReader(files[k]); Image img = Image.FromStream(streamReader.BaseStream); streamReader.Close();
base64Thumbnails.Add(img.ToBase64Thumbnail(width, height, wrapImageTag));
img.Dispose(); }
return base64Thumbnails; }

The ToBase64Thumbnails method implements the static method in order to search a specified directory path. When invoking the ToBase64Thumbnails method the calling code can optionally specify a number of file extensions, which results in only files having file extensions conforming to the specified extensions being encoded.

Once an array of file paths have been determined the sample code iterates the array creating an object of each file specified. The final step required is to invoke the ToBase64Thumbnail.

The implementation

The sample source code defines a console based application, used to test/illustrate creating encoded based on a specified directory path.  Included in the sample code is a template html file. The Main method generates a list of encoded by invoking ToBase64Thumbnails, defined as an targeting the String class. The resulting encoded are defined as Html <img> tags, added to a copy of the html template file. The Console application’s definition:

static void Main(string[] args)
{
    string path = "Images";

List<string> thumbnailTags = path.ToBase64Thumbnails(100, 100, true, null);
StreamReader streamreader = new StreamReader("HtmlTemplate.htm"); StringBuilder htmlPage = new StringBuilder(streamreader.ReadToEnd()); streamreader.Close();
StringBuilder imageTags = new StringBuilder();
for (int k = 0; k < thumbnailTags.Count; k++) { imageTags.AppendLine("<p>"); imageTags.AppendLine(thumbnailTags[k]); imageTags.AppendLine("</p>"); }
htmlPage.Replace("<!--Tags_Placeholder-->", imageTags.ToString());
StreamWriter streamwriter = new StreamWriter("TempPage.htm", false, Encoding.UTF8); streamwriter.Write(htmlPage.ToString()); streamwriter.Close();
Process.Start("TempPage.htm");
Console.ReadKey(); }

The resulting encoded image viewed as html <img> tags forming part of an html file, as viewed in Microsoft Internet Explorer 9:

Base64Thumbnails

C# How to: Image filtering by directly manipulating Pixel ARGB values

Article purpose

In this article we discover creating basic filters implemented by directly manipulating the ARGB colour values associated with an ’s pixels. The different types of filters discussed are: Grayscale, Transparency, Image Negative and Sepia tone. All filters are implemented as targeting the class, as well as the class as the result of inheritance and upcasting.

Sample source code

This article is accompanied by a sample source code Visual Studio project which is available for download .

ARGB Overview

ARGB is an abbreviation for the term: “Alpha, Red, Green and Blue”. ARGB refers to four colour components represented by each pixel that forms part of an . In C# 32 bit ARGB are a fairly common occurrence,  each pixel being of a fixed size, namely 32 bits or 4 , which also equates to a standard integer. Each colour component consists of 8 bits or 1 , equating to a range of possible values starting at 0 inclusive and a maximum value of 255 inclusive. It can thus be logically deduced that each of the four ARGB components can be expressed as a value ranging from 0 to 255 inclusive.

A pixel’s alpha component represents a level of transparency, 255 being no transparency and 0 being completely transparent. The combination of Red, Green and Blue values together represent a single colour, the colour associated with an individual pixel.

We can apply filtering on an by manipulating the individual Alpha, Red, Green and Blue components of each pixel.

Extracting the ARGB components of each pixel in an image

In C# an ’s ARGB components are actually stored in the format Blue, Green, Red, Alpha. Before attempting to extract each pixel’s individual components we need to ensure that our source is in fact formatted as a 32Bit ARGB . The source code snippet listed below converts source images into 32Bit ARGB formatted :

private static Bitmap GetArgbCopy(Image sourceImage)
{
    Bitmap bmpNew = new Bitmap(sourceImage.Width, sourceImage.Height, PixelFormat.Format32bppArgb);

using(Graphics graphics = Graphics.FromImage(bmpNew)) { graphics.DrawImage(sourceImage, new Rectangle (0, 0, bmpNew.Width, bmpNew.Height), new Rectangle (0, 0, bmpNew.Width, bmpNew.Height), GraphicsUnit.Pixel); graphics.Flush(); }
return bmpNew; }

The GetArgbCopy method creates a blank memory having the same size dimensions as the source . The newly created is explicitly specified to conform to a 32Bit ARGB format. By making use of a object of which the context is bound to the new instance the source code draws the original image to the new .

The Transparency Filter

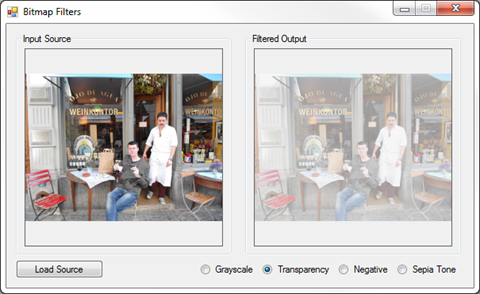
The transparency filter is intended to create a copy of an , increase the copy’s level of transparency and return the modified copy to the calling code. Listed below is source code which defines the CopyWithTransparency .

public static Bitmap CopyWithTransparency(this Image sourceImage, byte alphaComponent = 100)
{
    Bitmap bmpNew = GetArgbCopy(sourceImage);
    BitmapData bmpData = bmpNew.LockBits(new Rectangle(0, 0, sourceImage.Width, sourceImage.Height), ImageLockMode.ReadOnly, PixelFormat.Format32bppArgb);

IntPtr ptr = bmpData.Scan0;
byte[] byteBuffer = new byte[bmpData.Stride * bmpNew.Height];
Marshal.Copy(ptr, byteBuffer, 0, byteBuffer.Length);
for (int k = 3; k < byteBuffer.Length; k += 4) { byteBuffer[k] = alphaComponent; }
Marshal.Copy(byteBuffer, 0, ptr, byteBuffer.Length);
bmpNew.UnlockBits(bmpData);
bmpData = null; byteBuffer = null;
return bmpNew; }

As discussed earlier, the CopyWithTransparency method creates a 32Bit ARGB formatted copy of the specified source by invoking the method GetArgbCopy. In order to extract the pixel data we implement the class and the method defined by the class. Next we create an which references the very first pixel. points to the memory address of the first pixel. Next the source code instantiates a array which will used to represent pixel components.

The method copies from memory, starting at the address of the first pixel continuing up until the last pixel. The alpha component can be specified by the calling code, or if not specified defaults to a value of 100 due to being a .

How much transparency results from an alpha component of 100? If the maximum value is set at 255 representing no transparency 100 expressed as a percentage of 255 equates to roughly 39.2%. Defining an alpha value of 100 will thus result in an image being roughly 60% transparent.

Notice how the for loop only affects every fourth array element, beginning at index 3. Each element in the array represents a pixel colour component, either Alpha, Red, Green or Blue. Remember as mentioned earlier, the components are in fact stored in the format Blue, Green, Red, Alpha. Every four array elements together represents one pixel. We only want to change the value of Alpha components, thus we start at the first pixel’s Alpha component at index 3 and then continue to iterate through the array, incrementing the index by four with each loop.

After having updated every pixel’s Alpha component the modified array is copied back into the actual object and returned to the calling code.

Transparency Filter

Image Filters Transparency

The Grayscale Filter

The filter operates in a fashion similar to the transparency filter discussed in the previous section. The following details the source code implementation of the CopyAsGrayScale .

public static Bitmap CopyAsGrayscale(this Image sourceImage)
{
    Bitmap bmpNew = GetArgbCopy(sourceImage);
    BitmapData bmpData = bmpNew.LockBits(new Rectangle(0, 0, sourceImage.Width, sourceImage.Height), ImageLockMode.ReadOnly, PixelFormat.Format32bppArgb);

IntPtr ptr = bmpData.Scan0;
byte[] byteBuffer = new byte[bmpData.Stride * bmpNew.Height];
Marshal.Copy(ptr, byteBuffer, 0, byteBuffer.Length);
float rgb = 0;
for (int k = 0; k < byteBuffer.Length; k += 4) { rgb = byteBuffer[k] * 0.11f; rgb += byteBuffer[k+1] * 0.59f; rgb += byteBuffer[k+2] * 0.3f;
byteBuffer[k] = (byte)rgb; byteBuffer[k + 1] = byteBuffer[k]; byteBuffer[k + 2] = byteBuffer[k];
byteBuffer[k + 3] = 255; }
Marshal.Copy(byteBuffer, 0, ptr, byteBuffer.Length);
bmpNew.UnlockBits(bmpData);
bmpData = null; byteBuffer = null;
return bmpNew; }

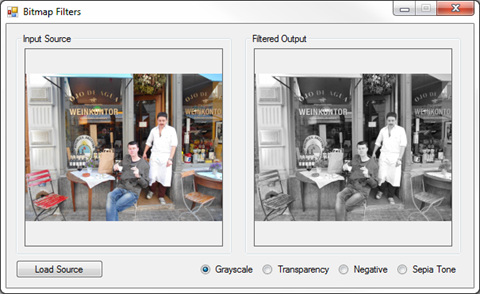
Notice how this filter starts iterating the pixel components at index 0. The source code assigns a weight to each colour component. The filter is achieved by adding together 11% Blue, 59% Green and 30% Red, then assigning the total value to each colour component. Transparency is set to 255, effectively disabling any level of transparency.

Grayscale Filter

ImageFilters_Grayscale

The Sepia Tone Filter

The sepia tone filter is implemented in the CopyAsSepiaTone. Notice how this method follows the same convention as the previously discussed filters. The source code listing is detailed below.

public static Bitmap CopyAsSepiaTone(this Image sourceImage)
{
    Bitmap bmpNew = GetArgbCopy(sourceImage);
    BitmapData bmpData = bmpNew.LockBits(new Rectangle(0, 0, sourceImage.Width, sourceImage.Height), ImageLockMode.ReadOnly, PixelFormat.Format32bppArgb);

IntPtr ptr = bmpData.Scan0;
byte[] byteBuffer = new byte[bmpData.Stride * bmpNew.Height];
Marshal.Copy(ptr, byteBuffer, 0, byteBuffer.Length);
byte maxValue = 255; float r = 0; float g = 0; float b = 0;
for (int k = 0; k < byteBuffer.Length; k += 4) { r = byteBuffer[k] * 0.189f + byteBuffer[k + 1] * 0.769f + byteBuffer[k + 2] * 0.393f; g = byteBuffer[k] * 0.168f + byteBuffer[k + 1] * 0.686f + byteBuffer[k + 2] * 0.349f; b = byteBuffer[k] * 0.131f + byteBuffer[k + 1] * 0.534f + byteBuffer[k + 2] * 0.272f;
byteBuffer[k+2] = (r > maxValue ? maxValue : (byte)r); byteBuffer[k + 1] = (g > maxValue ? maxValue : (byte)g); byteBuffer[k] = (b > maxValue ? maxValue : (byte)b); }
Marshal.Copy(byteBuffer, 0, ptr, byteBuffer.Length);
bmpNew.UnlockBits(bmpData);
bmpData = null; byteBuffer = null;
return bmpNew; }

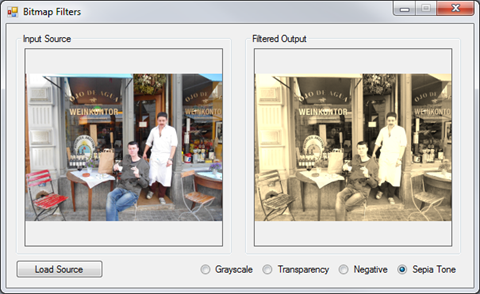
The formula used to calculate a sepia tone differs significantly from the filter discussed previously. The formula can be simplified as follows:

  • Red Component: Sum total of: 18.9% blue, 76.9% green, 39.3% red
  • Green Component: Sum total of: 16.8% blue, 68.6% green, 34.9% red
  • Blue Component: Sum total of: 13.1% blue, 53.4% green, 27.2% red

If any of the totalled values exceeds the value of 255 that value is then defined as 255.

Sepia Tone Filter

ImageFilters_Sepia

The Negative Image Filter

Non digital film based cameras produce what is referred to as negatives, which have to be developed into printed photographs using various chemical processes. (I shudder at the thought of labelling 35mm film cameras as “old school” or vintage. I’m old enough to remember a time when film cameras were the norm yet young enough to never have used a rotary phone.)

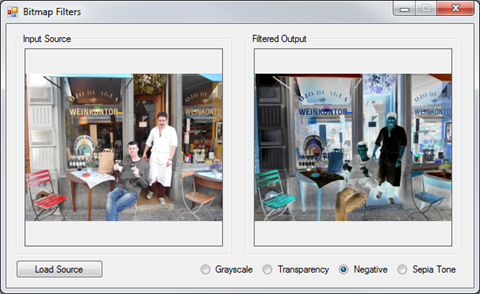
We can implement an filter that resembles film negatives by literally inverting every pixel’s colour components. It is fairly simple to invert colour data by implementing the bitwise compliment operator ~, the result being each bit will be reversed. Note: Only colour components are inverted, the Alpha component remains unchanged. Listed below is the source code implementation of the CopyAsNegative extension method.

public static Bitmap CopyAsNegative(this Image sourceImage)
{
    Bitmap bmpNew = GetArgbCopy(sourceImage);
    BitmapData bmpData = bmpNew.LockBits(new Rectangle(0, 0, sourceImage.Width, sourceImage.Height), ImageLockMode.ReadOnly, PixelFormat.Format32bppArgb);

IntPtr ptr = bmpData.Scan0;
byte[] byteBuffer = new byte[bmpData.Stride * bmpNew.Height];
Marshal.Copy(ptr, byteBuffer, 0, byteBuffer.Length); byte[] pixelBuffer = null;
int pixel = 0;
for (int k = 0; k < byteBuffer.Length; k += 4) { pixel = ~BitConverter.ToInt32(byteBuffer, k); pixelBuffer = BitConverter.GetBytes(pixel);
byteBuffer[k] = pixelBuffer[0]; byteBuffer[k + 1] = pixelBuffer[1]; byteBuffer[k + 2] = pixelBuffer[2]; }
Marshal.Copy(byteBuffer, 0, ptr, byteBuffer.Length);
bmpNew.UnlockBits(bmpData);
bmpData = null; byteBuffer = null;
return bmpNew; }

The negative filter formula extracts the four ARGB components storing the result as an integer value which represents a pixel. All of the pixel’s bits are reversed using the bitwise compliment operator. The resulting integer value is converted back into the four pixel components and assigned to replace the pixel’s original values, all except the alpha component.

Negative Filter

ImageFilters_Negative

The implementation

The filters described in this article are all implemented by means of a . filtering is applied by selecting the corresponding radio button. The source loaded from the file system serves as input to the various filter methods, the filtered image copy returned will be displayed next to the original source .

private void OnCheckChangedEventHandler(object sender, EventArgs e)
{
    if (picSource.BackgroundImage != null)
    {
        if (rdGrayscale.Checked == true)
        {
            picOutput.BackgroundImage = picSource.BackgroundImage.CopyAsGrayscale();
        }
        else if (rdTransparency.Checked == true)
        {
            picOutput.BackgroundImage = picSource.BackgroundImage.CopyWithTransparency();
        }
        else if (rdNegative.Checked == true)
        {
            picOutput.BackgroundImage = picSource.BackgroundImage.CopyAsNegative();
        }
        else if (rdSepia.Checked == true)
        {
            picOutput.BackgroundImage = picSource.BackgroundImage.CopyAsSepiaTone();
        }
    }
}
 

Related Articles and Feedback

Feedback and questions are always encouraged. If you know of an alternative implementation or have ideas on a more efficient implementation please share in the comments section.

I’ve published a number of articles related to imaging and images of which you can find URL links here:

C# How to: Encoding Bitmaps to Base64 strings

Article purpose

This article explores encoding Bitmap images to Base64 strings. Encoding is implemented by means of an extension method targeting the Bitmap class.

Sample source code

This article is accompanied by a sample source code Visual Studio project which is available for download .

Images as Base64 strings

From :

Base64 is a group of similar encoding schemes that represent binary data in an ASCII string format by translating it into a radix-64 representation. The Base64 term originates from a specific MIME content transfer encoding.

Base64 encoding schemes are commonly used when there is a need to encode binary data that need to be stored and transferred over media that are designed to deal with textual data. This is to ensure that the data remain intact without modification during transport. Base64 is commonly used in a number of applications including email via MIME, and storing complex data in XML.

From the definition quoted above the need for base64 encoding becomes more clear. From MSDN documentation:

The base-64 digits in ascending order from zero are the uppercase characters "A" to "Z", the lowercase characters "a" to "z", the numerals "0" to "9", and the symbols "+" and "/". The valueless character, "=", is used for trailing padding.

Base64 encoding allows developers to expose binary data without potentially encountering conflicts in regards to the transfer medium. Base64 encoded binary data serves ideally when performing data transfer operations using platforms such as html, xml, email.

A common implementation of Base64 encoding can be found when transferring image data. This article details how to convert/encode a object to a Base64 string.

Base64 Bitmap encoding implemented as an extension method

The code snippet listed below details the ToBase64String extension method targeting the class.

public static string ToBase64String(this Bitmap bmp, ImageFormat imageFormat)
{
    string base64String = string.Empty;

MemoryStream memoryStream = new MemoryStream(); bmp.Save(memoryStream, imageFormat);
memoryStream.Position = 0; byte[] byteBuffer = memoryStream.ToArray();
memoryStream.Close();
base64String = Convert.ToBase64String(byteBuffer); byteBuffer = null;
return base64String; }

The ToBase64String method writes the targeted object’s pixel data to a object using the specified parameter. Next a byte array is extracted and passed to the method , which is responsible for implementing the Base64 encoding.

Creating an Image tag implementing a Base64 string

The sample source code in addition also defines an extension method to generate html image tags to display a Base64 string encoded image.

 public static string ToBase64ImageTag(this Bitmap bmp, ImageFormat imageFormat)
{
    string imgTag = string.Empty;
    string base64String = string.Empty;

base64String = bmp.ToBase64String(imageFormat);
imgTag = "<img src=\\"data:image/" + imageFormat.ToString() + ";base64,"; imgTag += base64String + "\\" "; imgTag += "width=\\"" + bmp.Width.ToString() + "\\" "; imgTag += "height=\\"" + bmp.Height.ToString() + "\\" />";
return imgTag; }

The ToBase64ImageTag extension method invokes the ToBase64String extension method in order to retrieve encoded the data. The Html image tag has only to be slightly modified from the norm in order to accommodate Base64 encoded strings.

The implementation

The two extension methods are implemented using a console based application.

 static void Main(string[] args)
{
    StreamReader streamReader = new StreamReader("NavForward.png");
    Bitmap bmp = new Bitmap(streamReader.BaseStream);
    streamReader.Close();

string base64ImageAndTag = bmp.ToBase64ImageTag(ImageFormat.Png);
Console.WriteLine(base64ImageAndTag);
Console.ReadKey(); }

Dewald Esterhuizen

Blog Stats

  • 869,828 hits

Enter your email address to follow and receive notifications of new posts by email.
Join 228 other subscribers
Archives

RSS SoftwareByDefault on MSDN

  • An error has occurred; the feed is probably down. Try again later.