Posts Tagged 'GDI'

C# How to: Bitmap Colour Substitution implementing thresholds

Article Purpose

This article is aimed at detailing how to implement the process of substituting the colour values that form part of a image. Colour substitution is implemented by means of a threshold value. By implementing a threshold a range of similar colours can be substituted.

Sample source code

This article is accompanied by a sample source code Visual Studio project which is available for download here.

Using the sample Application

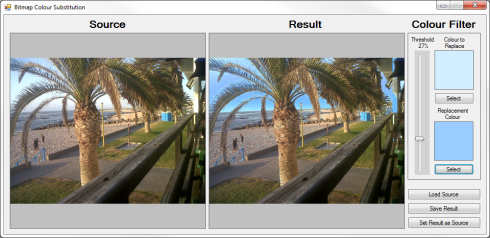
The provided sample source code builds a Windows Forms application which can be used to test/implement the concepts described in this article. The sample application enables the user to load an file from the file system, the user can then specify the colour to replace, the replacement colour and the threshold to apply. The following image is a screenshot of the sample application in action.

BitmapColourSubstitution_Scaled

The scenario detailed in the above screenshot shows the sample application being used to create an where the sky has more of a bluish hue when compared to the original .

Notice how replacement colour does not simply appear as a solid colour applied throughout. The replacement colour gets implemented matching the intensity of the colour being substituted.

The colour filter options:

FilterOptions

The colour to replace was taken from the original , the replacement colour is specified through a colour picker dialog. When a user clicks on either displayed, the colour of the pixel clicked on sets the value of the replacement colour. By adjusting the threshold value the user can specify how wide or narrow the range of colours to replace should be. The higher the threshold value, the wider the range of colours that will be replaced.

The resulting image can be saved by clicking the “Save Result” button. In order to apply another colour substitution on the resulting image click the button labelled “Set Result as Source”.

Colour Substitution Filter Data

The sample source code provides the definition for the ColorSubstitutionFilter class. The purpose of this class is to contain data required when applying colour substitution. The ColorSubstitutionFilter class is defined as follows:

public class ColorSubstitutionFilter
{
    private int thresholdValue = 10;
    public int ThresholdValue
    {
        get { return thresholdValue; }
        set { thresholdValue = value; }
    }

private Color sourceColor = Color.White; public Color SourceColor { get { return sourceColor; } set { sourceColor = value; } }
private Color newColor = Color.White; public Color NewColor { get { return newColor; } set { newColor = value; } } }

To implement a colour substitution filter we first have to create an object instance of type ColorSubstitutionFilter. A colour substitution requires specifying a SourceColor, which is the colour to replace/substitute and a NewColour, which defines the colour that will replace the SourceColour. Also required is a ThresholdValue, which determines a range of colours based on the SourceColor.

Colour Substitution implemented as an Extension method

The sample source code defines the ColorSubstitution extension method which targets the class. Invoking the ColorSubstitution requires passing a parameter of type ColorSubstitutionFilter, which defines how colour substitution is to be implemented. The following code snippet contains the definition of the ColorSubstitution method.

public static Bitmap ColorSubstitution(this Bitmap sourceBitmap, ColorSubstitutionFilter filterData)
{
    Bitmap resultBitmap = new Bitmap(sourceBitmap.Width, sourceBitmap.Height, PixelFormat.Format32bppArgb);

BitmapData sourceData = sourceBitmap.LockBits(new Rectangle(0, 0, sourceBitmap.Width, sourceBitmap.Height), ImageLockMode.ReadOnly, PixelFormat.Format32bppArgb); BitmapData resultData = resultBitmap.LockBits(new Rectangle(0, 0, resultBitmap.Width, resultBitmap.Height), ImageLockMode.WriteOnly, PixelFormat.Format32bppArgb);
byte[] resultBuffer = new byte[resultData.Stride * resultData.Height]; Marshal.Copy(sourceData.Scan0, resultBuffer, 0, resultBuffer.Length);
sourceBitmap.UnlockBits(sourceData);
byte sourceRed = 0, sourceGreen = 0, sourceBlue = 0, sourceAlpha = 0; int resultRed = 0, resultGreen = 0, resultBlue = 0;
byte newRedValue = filterData.NewColor.R; byte newGreenValue = filterData.NewColor.G; byte newBlueValue = filterData.NewColor.B;
byte redFilter = filterData.SourceColor.R; byte greenFilter = filterData.SourceColor.G; byte blueFilter = filterData.SourceColor.B;
byte minValue = 0; byte maxValue = 255;
for (int k = 0; k < resultBuffer.Length; k += 4) { sourceAlpha = resultBuffer[k + 3];
if (sourceAlpha != 0) { sourceBlue = resultBuffer[k]; sourceGreen = resultBuffer[k + 1]; sourceRed = resultBuffer[k + 2];
if ((sourceBlue < blueFilter + filterData.ThresholdValue && sourceBlue > blueFilter - filterData.ThresholdValue) &&
(sourceGreen < greenFilter + filterData.ThresholdValue && sourceGreen > greenFilter - filterData.ThresholdValue) &&
(sourceRed < redFilter + filterData.ThresholdValue && sourceRed > redFilter - filterData.ThresholdValue)) { resultBlue = blueFilter - sourceBlue + newBlueValue;
if (resultBlue > maxValue) { resultBlue = maxValue;} else if (resultBlue < minValue) { resultBlue = minValue;}
resultGreen = greenFilter - sourceGreen + newGreenValue;
if (resultGreen > maxValue) { resultGreen = maxValue;} else if (resultGreen < minValue) { resultGreen = minValue;}
resultRed = redFilter - sourceRed + newRedValue;
if (resultRed > maxValue) { resultRed = maxValue;} else if (resultRed < minValue) { resultRed = minValue;}
resultBuffer[k] = (byte)resultBlue; resultBuffer[k + 1] = (byte)resultGreen; resultBuffer[k + 2] = (byte)resultRed; resultBuffer[k + 3] = sourceAlpha; } } }
Marshal.Copy(resultBuffer, 0, resultData.Scan0, resultBuffer.Length); resultBitmap.UnlockBits(resultData);
return resultBitmap; }

The ColorSubstitution method can be labelled as due to its implementation. Being implies that the source/input data will not be modified, instead a new instance will be created reflecting the source data as modified by the operations performed in the particular method.

The first statement defined in the ColorSubstitution method body instantiates an instance of a new , matching the size dimensions of the source object. Next the method invokes the method on the source and result instances. When invoking the underlying data representing a will be locked in memory. Being locked in memory can also be described as signalling/preventing the Garbage Collector to not move around in memory the data being locked. Invoking results in the Garbage Collector functioning as per normal, moving data in memory and updating the relevant memory references when required.

The source code continues by copying all the representing the source to an array of bytes that represents the resulting . At this stage the source and result s are exactly identical and as yet unmodified. In order to determine which pixels based on colour should be modified the source code iterates through the byte array associated with the result .

Notice how the for loop increments by 4 with each loop. The underlying data represents a 32 Bits per pixel Argb , which equates to 8 bits/1 representing an individual colour component, either Alpha, Red, Green or Blue. Defining the for loop to increment by 4 results in each loop iterating 4 or 32 bits, in essence 1 pixel.

Within the for loop we determine if the colour expressed by the current pixel adjusted by the threshold value forms part of the colour range that should be updated. It is important to remember that an individual colour component is a byte value and can only be set to a value between 0 and 255 inclusive.

The Implementation

The ColorSubstitution method is implemented by the sample source code  through a Windows Forms application. The ColorSubstitution method requires that the source specified must be  formatted as a 32 Bpp Argb . When the user loads a source image from the file system the sample application attempts to convert the selected file by invoking the Format32bppArgbCopy which targets the class. The definition is as follows:

public static Bitmap Format32bppArgbCopy(this Bitmap sourceBitmap)
{
    Bitmap copyBitmap = new Bitmap(sourceBitmap.Width, sourceBitmap.Height, PixelFormat.Format32bppArgb);

using (Graphics graphicsObject = Graphics.FromImage(copyBitmap)) { graphicsObject.CompositingQuality = System.Drawing.Drawing2D.CompositingQuality.HighQuality; graphicsObject.InterpolationMode = System.Drawing.Drawing2D.InterpolationMode.HighQualityBicubic; graphicsObject.PixelOffsetMode = System.Drawing.Drawing2D.PixelOffsetMode.HighQuality; graphicsObject.SmoothingMode = System.Drawing.Drawing2D.SmoothingMode.HighQuality;
graphicsObject.DrawImage(sourceBitmap, new Rectangle(0, 0, sourceBitmap.Width, sourceBitmap.Height), new Rectangle(0, 0, sourceBitmap.Width, sourceBitmap.Height), GraphicsUnit.Pixel); }
return copyBitmap; }

Colour Substitution Examples

The following section illustrates a few examples of colour substitution result . The source image features Bellis perennis also known as the common European Daisy (see Wikipedia). The image file is licensed under the Creative Commons Attribution-Share Alike 2.5 Generic license. The original image can be downloaded here. The following image is a scaled down version of the original:

Bellis_perennis_white_(aka)_scaled

Light Blue Colour Substitution

Colour Component Source Colour Substitute Colour
Red   255   121
Green   223   188
Blue   224   255

Daisy_light_blue

Medium Blue Colour Substitution

Colour Component Source Colour Substitute Colour
Red   255   34
Green   223   34
Blue   224   255

Daisy_medium_blue

Medium Green Colour Substitution

Colour Component Source Colour Substitute Colour
Red   255   0
Green   223   128
Blue   224   0

Daisy_medium_green

Purple Colour Substitution

Colour Component Source Colour Substitute Colour
Red   255   128
Green   223   0
Blue   224   255

Daisy_purple

Related Articles and Feedback

Feedback and questions are always encouraged. If you know of an alternative implementation or have ideas on a more efficient implementation please share in the comments section.

I’ve published a number of articles related to imaging and images of which you can find URL links here:

C# How to: Image filtering implemented using a ColorMatrix

Article purpose

This is based around creating basic filters. The different types of filters discussed are: Grayscale, Transparency, Image Negative and Sepia tone. All filters are implemented as targeting the Image class, as well as the Bitmap class as the result of inheritance and upcasting.

Note: This is a follow up to . The previously published related article implements filtering by performing calculations and updating pixel colour component values namely Alpha, Red, Green and Blue. This achieves the same filtering through implementing various transformations, in essence providing an alternative solution. For the sake of convenience I have included the pixel manipulation in addition to the detailed by this article.

Sample source code

This is accompanied by a sample source code Visual Studio project which is available for download .

Implementing a ColorMatrix

From :

Defines a 5 x 5 matrix that contains the coordinates for the RGBAW space. Several methods of the ImageAttributes class adjust image colors by using a color matrix.

The matrix coefficients constitute a 5 x 5 linear transformation that is used for transforming ARGB homogeneous values. For example, an ARGB vector is represented as red, green, blue, alpha and w, where w is always 1.

When implementing a translation using the class values specified are added to one or more of the four colour components. A value that is to be added may only range from 0 to 1 inclusive. Note that adding a negative value results in subtracting values. A good article that illustrates implementing a can be found on MSDN: How to: Translate Image Colors.

The following code snippet provides the implementation of the ApplyColorMatrix method.

private static Bitmap ApplyColorMatrix(Image sourceImage, ColorMatrix colorMatrix)
{
    Bitmap bmp32BppSource = GetArgbCopy(sourceImage);
    Bitmap bmp32BppDest = new Bitmap(bmp32BppSource.Width, bmp32BppSource.Height, PixelFormat.Format32bppArgb);

using (Graphics graphics = Graphics.FromImage(bmp32BppDest)) { ImageAttributes bmpAttributes = new ImageAttributes(); bmpAttributes.SetColorMatrix(colorMatrix); graphics.DrawImage(bmp32BppSource, new Rectangle(0, 0, bmp32BppSource.Width, bmp32BppSource.Height), 0, 0, bmp32BppSource.Width, bmp32BppSource.Height, GraphicsUnit.Pixel, bmpAttributes);
}
bmp32BppSource.Dispose();
return bmp32BppDest; }

The ApplyColorMatrix method signature defines a parameter of type and a second parameter of type . This method is intended to apply the specified upon the parameter specified.

The source is firstly copied in order to ensure that the that is to be transformed is defined with a pixel format of 32 bits per pixel, consisting of the colour components Alpha, Red, Green and Blue. Next we create a blank memory defined to reflect the same size dimensions as the original source . A can be implemented by means of applying an when invoking the defined by the class.

Creating an ARGB copy

The source code snippet listed below converts source images into 32Bit ARGB formatted :

private static Bitmap GetArgbCopy(Image sourceImage)
{
    Bitmap bmpNew = new Bitmap(sourceImage.Width, sourceImage.Height, PixelFormat.Format32bppArgb);

using(Graphics graphics = Graphics.FromImage(bmpNew)) { graphics.DrawImage(sourceImage, new Rectangle (0, 0, bmpNew.Width, bmpNew.Height), new Rectangle (0, 0, bmpNew.Width, bmpNew.Height), GraphicsUnit.Pixel); graphics.Flush(); }
return bmpNew; }

The GetArgbCopy method creates a blank memory Bitmap having the same size dimensions as the source image. The newly created Bitmap is explicitly specified to conform to a 32Bit ARGB format. By making use of a Graphics object of which the context is bound to the new Bitmap instance the source code draws the original image to the new Bitmap.

The Transparency Filter

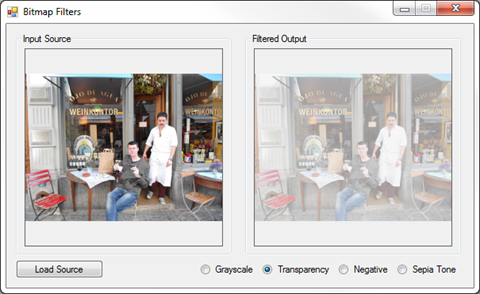
The transparency filter is intended to create a copy of an , increase the copy’s level of transparency and return the modified copy to the calling code. Listed below is source code which defines the DrawWithTransparency extension method.

public static Bitmap DrawWithTransparency(this Image sourceImage)
{
    ColorMatrix colorMatrix = new ColorMatrix(new float[][]
                        {
                            new float[]{1, 0, 0, 0, 0},
                            new float[]{0, 1, 0, 0, 0},
                            new float[]{0, 0, 1, 0, 0},
                            new float[]{0, 0, 0, 0.3f, 0},
                            new float[]{0, 0, 0, 0, 1}
                        });

return ApplyColorMatrix(sourceImage, colorMatrix); }

Due to the ApplyColorMatrix method defined earlier implementing an filter simply consists of defining the filter algorithm in the form of a and then invoking ApplyColorMatrix.

The is defined to apply no change to the Red, Green and Blue components whilst reducing the Alpha component by 70%.

Image Filters Transparency ColorMatrix

The Grayscale Filter

All of the filter illustrated in this are implemented in a fashion similar to the DrawWithTransparency method. The DrawAsGrayscale is implemented as follows:

public static Bitmap DrawAsGrayscale(this Image sourceImage)
{
    ColorMatrix colorMatrix = new ColorMatrix(new float[][]
                        {
                            new float[]{.3f, .3f, .3f, 0, 0},
                            new float[]{.59f, .59f, .59f, 0, 0},
                            new float[]{.11f, .11f, .11f, 0, 0},
                            new float[]{0, 0, 0, 1, 0},
                            new float[]{0, 0, 0, 0, 1}
                        });

return ApplyColorMatrix(sourceImage, colorMatrix); }

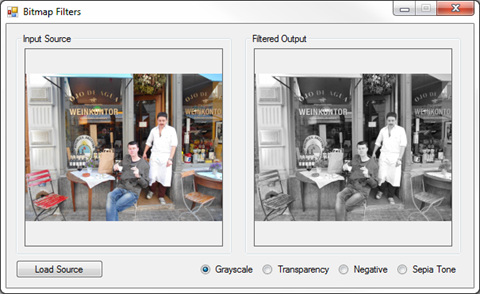
The grayscale filter is achieved by adding together 11% blue, 59% green and 30% red, then assigning the total value to each colour component.

Image Filters Grayscale ColorMatrix

The Sepia Tone Filter

The sepia tone filter is implemented in the DrawAsSepiaTone. Notice how this method follows the same convention as the previously discussed filters. The source code listing is detailed below.

 public static Bitmap DrawAsSepiaTone(this Image sourceImage)
{
     ColorMatrix colorMatrix = new ColorMatrix(new float[][] 
                {
                        new float[]{.393f, .349f, .272f, 0, 0},
                        new float[]{.769f, .686f, .534f, 0, 0},
                        new float[]{.189f, .168f, .131f, 0, 0},
                        new float[]{0, 0, 0, 1, 0},
                        new float[]{0, 0, 0, 0, 1}
                });

return ApplyColorMatrix(sourceImage, colorMatrix); }

The formula used to calculate a sepia tone differs significantly from the grayscale filter discussed previously. The formula can be simplified as follows:

  • Red Component: Sum total of: 39.3% red, 34.9% green , 27.2% blue
  • Green Component: Sum total of: 76.9% red, 68.6% green , 53.4% blue
  • Blue Component: Sum total of: 18.9% red, 16.8% green , 13.1% blue

Image Filters Sepia ColorMatrix

The Negative Image Filter

We can implement an filter that resembles film negatives by literally inverting every pixel’s colour components. Listed below is the source code implementation of the DrawAsNegative .

 public static Bitmap DrawAsNegative(this Image sourceImage)
{
     ColorMatrix colorMatrix = new ColorMatrix(new float[][] 
                    {
                            new float[]{-1, 0, 0, 0, 0},
                            new float[]{0, -1, 0, 0, 0},
                            new float[]{0, 0, -1, 0, 0},
                            new float[]{0, 0, 0, 1, 0},
                            new float[]{1, 1, 1, 1, 1}
                    });

return ApplyColorMatrix(sourceImage, colorMatrix); }

Notice how the negative filter subtracts 1 from each colour component, remember the valid range being 0 to 1 inclusive. This in reality inverts each pixel’s colour component bits. The transform being applied can also be expressed as implementing the bitwise compliment operator on each pixel.

Image Filters Negative Color Matrix

The implementation

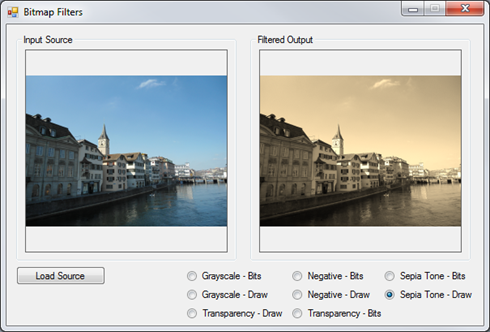
The filters described in this are all implemented by means of a . filtering is applied by selecting the corresponding radio button. The source loaded from the file system serves as input to the various filter methods, the filtered copy returned will be displayed next to the original source .

The following code snippet details the radio button checked changed event handler:

private void OnCheckChangedEventHandler(object sender, EventArgs e)
{
    if (picSource.BackgroundImage != null)
    {
        if (rdGrayscaleBits.Checked == true)
        {
             picOutput.BackgroundImage = picSource.BackgroundImage.CopyAsGrayscale();
        }
        else if (rdGrayscaleDraw.Checked == true)
        {
             picOutput.BackgroundImage = picSource.BackgroundImage.DrawAsGrayscale();
        }
        else if (rdTransparencyBits.Checked == true)
        {
             picOutput.BackgroundImage = picSource.BackgroundImage.CopyWithTransparency();
        }
        else if (rdTransparencyDraw.Checked == true)
        {
             picOutput.BackgroundImage = picSource.BackgroundImage.DrawWithTransparency();
        }
        else if (rdNegativeBits.Checked == true)
        {
             picOutput.BackgroundImage = picSource.BackgroundImage.CopyAsNegative();
        }
        else if (rdNegativeDraw.Checked == true)
        {
             picOutput.BackgroundImage = picSource.BackgroundImage.DrawAsNegative();
        }
        else if (rdSepiaBits.Checked == true)
        {
             picOutput.BackgroundImage = picSource.BackgroundImage.CopyAsSepiaTone();
        }
        else if (rdSepiaDraw.Checked == true)
        {
             picOutput.BackgroundImage = picSource.BackgroundImage.DrawAsSepiaTone();
        }
    }
}

Related Articles

C# How to: Image filtering by directly manipulating Pixel ARGB values

Article purpose

In this article we discover creating basic filters implemented by directly manipulating the ARGB colour values associated with an ’s pixels. The different types of filters discussed are: Grayscale, Transparency, Image Negative and Sepia tone. All filters are implemented as targeting the class, as well as the class as the result of inheritance and upcasting.

Sample source code

This article is accompanied by a sample source code Visual Studio project which is available for download .

ARGB Overview

ARGB is an abbreviation for the term: “Alpha, Red, Green and Blue”. ARGB refers to four colour components represented by each pixel that forms part of an . In C# 32 bit ARGB are a fairly common occurrence,  each pixel being of a fixed size, namely 32 bits or 4 , which also equates to a standard integer. Each colour component consists of 8 bits or 1 , equating to a range of possible values starting at 0 inclusive and a maximum value of 255 inclusive. It can thus be logically deduced that each of the four ARGB components can be expressed as a value ranging from 0 to 255 inclusive.

A pixel’s alpha component represents a level of transparency, 255 being no transparency and 0 being completely transparent. The combination of Red, Green and Blue values together represent a single colour, the colour associated with an individual pixel.

We can apply filtering on an by manipulating the individual Alpha, Red, Green and Blue components of each pixel.

Extracting the ARGB components of each pixel in an image

In C# an ’s ARGB components are actually stored in the format Blue, Green, Red, Alpha. Before attempting to extract each pixel’s individual components we need to ensure that our source is in fact formatted as a 32Bit ARGB . The source code snippet listed below converts source images into 32Bit ARGB formatted :

private static Bitmap GetArgbCopy(Image sourceImage)
{
    Bitmap bmpNew = new Bitmap(sourceImage.Width, sourceImage.Height, PixelFormat.Format32bppArgb);

using(Graphics graphics = Graphics.FromImage(bmpNew)) { graphics.DrawImage(sourceImage, new Rectangle (0, 0, bmpNew.Width, bmpNew.Height), new Rectangle (0, 0, bmpNew.Width, bmpNew.Height), GraphicsUnit.Pixel); graphics.Flush(); }
return bmpNew; }

The GetArgbCopy method creates a blank memory having the same size dimensions as the source . The newly created is explicitly specified to conform to a 32Bit ARGB format. By making use of a object of which the context is bound to the new instance the source code draws the original image to the new .

The Transparency Filter

The transparency filter is intended to create a copy of an , increase the copy’s level of transparency and return the modified copy to the calling code. Listed below is source code which defines the CopyWithTransparency .

public static Bitmap CopyWithTransparency(this Image sourceImage, byte alphaComponent = 100)
{
    Bitmap bmpNew = GetArgbCopy(sourceImage);
    BitmapData bmpData = bmpNew.LockBits(new Rectangle(0, 0, sourceImage.Width, sourceImage.Height), ImageLockMode.ReadOnly, PixelFormat.Format32bppArgb);

IntPtr ptr = bmpData.Scan0;
byte[] byteBuffer = new byte[bmpData.Stride * bmpNew.Height];
Marshal.Copy(ptr, byteBuffer, 0, byteBuffer.Length);
for (int k = 3; k < byteBuffer.Length; k += 4) { byteBuffer[k] = alphaComponent; }
Marshal.Copy(byteBuffer, 0, ptr, byteBuffer.Length);
bmpNew.UnlockBits(bmpData);
bmpData = null; byteBuffer = null;
return bmpNew; }

As discussed earlier, the CopyWithTransparency method creates a 32Bit ARGB formatted copy of the specified source by invoking the method GetArgbCopy. In order to extract the pixel data we implement the class and the method defined by the class. Next we create an which references the very first pixel. points to the memory address of the first pixel. Next the source code instantiates a array which will used to represent pixel components.

The method copies from memory, starting at the address of the first pixel continuing up until the last pixel. The alpha component can be specified by the calling code, or if not specified defaults to a value of 100 due to being a .

How much transparency results from an alpha component of 100? If the maximum value is set at 255 representing no transparency 100 expressed as a percentage of 255 equates to roughly 39.2%. Defining an alpha value of 100 will thus result in an image being roughly 60% transparent.

Notice how the for loop only affects every fourth array element, beginning at index 3. Each element in the array represents a pixel colour component, either Alpha, Red, Green or Blue. Remember as mentioned earlier, the components are in fact stored in the format Blue, Green, Red, Alpha. Every four array elements together represents one pixel. We only want to change the value of Alpha components, thus we start at the first pixel’s Alpha component at index 3 and then continue to iterate through the array, incrementing the index by four with each loop.

After having updated every pixel’s Alpha component the modified array is copied back into the actual object and returned to the calling code.

Transparency Filter

Image Filters Transparency

The Grayscale Filter

The filter operates in a fashion similar to the transparency filter discussed in the previous section. The following details the source code implementation of the CopyAsGrayScale .

public static Bitmap CopyAsGrayscale(this Image sourceImage)
{
    Bitmap bmpNew = GetArgbCopy(sourceImage);
    BitmapData bmpData = bmpNew.LockBits(new Rectangle(0, 0, sourceImage.Width, sourceImage.Height), ImageLockMode.ReadOnly, PixelFormat.Format32bppArgb);

IntPtr ptr = bmpData.Scan0;
byte[] byteBuffer = new byte[bmpData.Stride * bmpNew.Height];
Marshal.Copy(ptr, byteBuffer, 0, byteBuffer.Length);
float rgb = 0;
for (int k = 0; k < byteBuffer.Length; k += 4) { rgb = byteBuffer[k] * 0.11f; rgb += byteBuffer[k+1] * 0.59f; rgb += byteBuffer[k+2] * 0.3f;
byteBuffer[k] = (byte)rgb; byteBuffer[k + 1] = byteBuffer[k]; byteBuffer[k + 2] = byteBuffer[k];
byteBuffer[k + 3] = 255; }
Marshal.Copy(byteBuffer, 0, ptr, byteBuffer.Length);
bmpNew.UnlockBits(bmpData);
bmpData = null; byteBuffer = null;
return bmpNew; }

Notice how this filter starts iterating the pixel components at index 0. The source code assigns a weight to each colour component. The filter is achieved by adding together 11% Blue, 59% Green and 30% Red, then assigning the total value to each colour component. Transparency is set to 255, effectively disabling any level of transparency.

Grayscale Filter

ImageFilters_Grayscale

The Sepia Tone Filter

The sepia tone filter is implemented in the CopyAsSepiaTone. Notice how this method follows the same convention as the previously discussed filters. The source code listing is detailed below.

public static Bitmap CopyAsSepiaTone(this Image sourceImage)
{
    Bitmap bmpNew = GetArgbCopy(sourceImage);
    BitmapData bmpData = bmpNew.LockBits(new Rectangle(0, 0, sourceImage.Width, sourceImage.Height), ImageLockMode.ReadOnly, PixelFormat.Format32bppArgb);

IntPtr ptr = bmpData.Scan0;
byte[] byteBuffer = new byte[bmpData.Stride * bmpNew.Height];
Marshal.Copy(ptr, byteBuffer, 0, byteBuffer.Length);
byte maxValue = 255; float r = 0; float g = 0; float b = 0;
for (int k = 0; k < byteBuffer.Length; k += 4) { r = byteBuffer[k] * 0.189f + byteBuffer[k + 1] * 0.769f + byteBuffer[k + 2] * 0.393f; g = byteBuffer[k] * 0.168f + byteBuffer[k + 1] * 0.686f + byteBuffer[k + 2] * 0.349f; b = byteBuffer[k] * 0.131f + byteBuffer[k + 1] * 0.534f + byteBuffer[k + 2] * 0.272f;
byteBuffer[k+2] = (r > maxValue ? maxValue : (byte)r); byteBuffer[k + 1] = (g > maxValue ? maxValue : (byte)g); byteBuffer[k] = (b > maxValue ? maxValue : (byte)b); }
Marshal.Copy(byteBuffer, 0, ptr, byteBuffer.Length);
bmpNew.UnlockBits(bmpData);
bmpData = null; byteBuffer = null;
return bmpNew; }

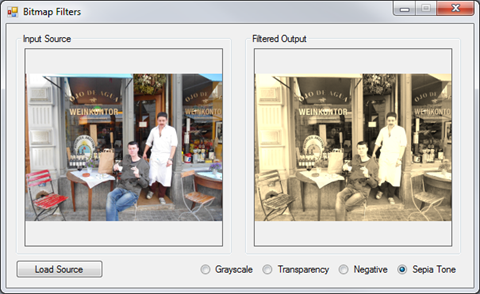
The formula used to calculate a sepia tone differs significantly from the filter discussed previously. The formula can be simplified as follows:

  • Red Component: Sum total of: 18.9% blue, 76.9% green, 39.3% red
  • Green Component: Sum total of: 16.8% blue, 68.6% green, 34.9% red
  • Blue Component: Sum total of: 13.1% blue, 53.4% green, 27.2% red

If any of the totalled values exceeds the value of 255 that value is then defined as 255.

Sepia Tone Filter

ImageFilters_Sepia

The Negative Image Filter

Non digital film based cameras produce what is referred to as negatives, which have to be developed into printed photographs using various chemical processes. (I shudder at the thought of labelling 35mm film cameras as “old school” or vintage. I’m old enough to remember a time when film cameras were the norm yet young enough to never have used a rotary phone.)

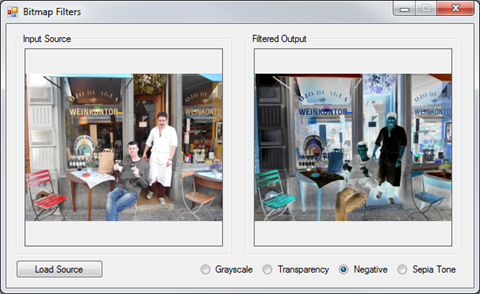
We can implement an filter that resembles film negatives by literally inverting every pixel’s colour components. It is fairly simple to invert colour data by implementing the bitwise compliment operator ~, the result being each bit will be reversed. Note: Only colour components are inverted, the Alpha component remains unchanged. Listed below is the source code implementation of the CopyAsNegative extension method.

public static Bitmap CopyAsNegative(this Image sourceImage)
{
    Bitmap bmpNew = GetArgbCopy(sourceImage);
    BitmapData bmpData = bmpNew.LockBits(new Rectangle(0, 0, sourceImage.Width, sourceImage.Height), ImageLockMode.ReadOnly, PixelFormat.Format32bppArgb);

IntPtr ptr = bmpData.Scan0;
byte[] byteBuffer = new byte[bmpData.Stride * bmpNew.Height];
Marshal.Copy(ptr, byteBuffer, 0, byteBuffer.Length); byte[] pixelBuffer = null;
int pixel = 0;
for (int k = 0; k < byteBuffer.Length; k += 4) { pixel = ~BitConverter.ToInt32(byteBuffer, k); pixelBuffer = BitConverter.GetBytes(pixel);
byteBuffer[k] = pixelBuffer[0]; byteBuffer[k + 1] = pixelBuffer[1]; byteBuffer[k + 2] = pixelBuffer[2]; }
Marshal.Copy(byteBuffer, 0, ptr, byteBuffer.Length);
bmpNew.UnlockBits(bmpData);
bmpData = null; byteBuffer = null;
return bmpNew; }

The negative filter formula extracts the four ARGB components storing the result as an integer value which represents a pixel. All of the pixel’s bits are reversed using the bitwise compliment operator. The resulting integer value is converted back into the four pixel components and assigned to replace the pixel’s original values, all except the alpha component.

Negative Filter

ImageFilters_Negative

The implementation

The filters described in this article are all implemented by means of a . filtering is applied by selecting the corresponding radio button. The source loaded from the file system serves as input to the various filter methods, the filtered image copy returned will be displayed next to the original source .

private void OnCheckChangedEventHandler(object sender, EventArgs e)
{
    if (picSource.BackgroundImage != null)
    {
        if (rdGrayscale.Checked == true)
        {
            picOutput.BackgroundImage = picSource.BackgroundImage.CopyAsGrayscale();
        }
        else if (rdTransparency.Checked == true)
        {
            picOutput.BackgroundImage = picSource.BackgroundImage.CopyWithTransparency();
        }
        else if (rdNegative.Checked == true)
        {
            picOutput.BackgroundImage = picSource.BackgroundImage.CopyAsNegative();
        }
        else if (rdSepia.Checked == true)
        {
            picOutput.BackgroundImage = picSource.BackgroundImage.CopyAsSepiaTone();
        }
    }
}
 

Related Articles and Feedback

Feedback and questions are always encouraged. If you know of an alternative implementation or have ideas on a more efficient implementation please share in the comments section.

I’ve published a number of articles related to imaging and images of which you can find URL links here:

C# How to: Using Microsoft Kinect with Windows Forms

Article purpose

This article illustrates a basic introductory level explanation of the steps required to interface with the Microsoft Kinect for Windows sensor using the Kinect for Windows Sdk implemented in a Windows Forms application.

Introduction

Most of the introduction level articles and code samples I’ve come across tend to be implemented as WPF or XNA based applications. Interfacing to the Microsoft Kinect for Windows sensor from Windows Forms based applications can be achieved fairly effortlessly. I find when wanting to create test applications a implementation can be developed quickly with relatively little hassle.

This article details creating a application which displays a live Video feed from the ’s Color camera whilst providing an option in specifying the resolution/frame rate.

Sample source code

This article is accompanied by sample source code in a Visual Studio project which is available for download here.

Sample Source Overview

The sample source code provided with this article consists of a which host a PictureBox control used to display the incoming Video feed. It is possible that more than one might be connected, the user can therefore select a sensor from a ComboBox. Possible resolutions/frame rates can also be configured via an additional ComboBox.

Available Kinect Sensors

The sample application implements the KinectSensor.KinectSensors property to retrieve a list of available . The associated ComboBox will be populated with references to available sensors.

private void PopulateAvailableSensors()
{
    cmbSensors.Items.Clear();

foreach (KinectSensor sensor in KinectSensor.KinectSensors) { cmbSensors.Items.Add(sensor.UniqueKinectId); cmbSensors.SelectedItem = sensor.UniqueKinectId; } }

Initial setup: Form Constructor

In the Form constructor we define the available display modes by adding the relevant enumeration values to the associated ComboBox.

public  MainForm() 
{ 
   InitializeComponent(); 

cmbDisplayMode.Items.Add(ColorImageFormat.RgbResolution640x480Fps30); cmbDisplayMode.Items.Add(ColorImageFormat.RgbResolution1280x960Fps12); cmbDisplayMode.SelectedIndex = 0;
PopulateAvailableSensors(); }

In this scenario we specify:

In the constructor the method PopulateAvailableSensors(), as described earlier, will be invoked after having specified available display modes.

Refreshing Available Sensors

Clicking the refresh button results in calling PopulateAvailableSensors(), which will re-determine available sensors and populate the associated ComboBox. Listed below is the click event handler subscribed to the Refresh button’s click event.

private void btnRefresh_Click(object sender, EventArgs e) 
{ 
    PopulateAvailableSensors(); 
} 

Activating the Sensor

When clicking on the “Activate Sensor” button the sample code first attempts to deactivate the sensor currently in use. After ensuring that resources related to the current sensor have been released the application attempts to assign an instance of the KinectSensor member object based on user selection.

private  void  btnActivateSensor_Click(object  sender, EventArgs  e) 
{ 
    if (cmbSensors.SelectedIndex != -1) 
    { 
        DeActivateSensor(); 

string sensorID = cmbSensors.SelectedItem.ToString();
foreach (KinectSensor sensor in KinectSensor.KinectSensors) { if (sensor.UniqueKinectId == sensorID) { kinectSensor = sensor; SetupSensorVideoInput(); } } } }

Sensor Video setup

In the sample application we implement the Kinect sensor’s ColorStream camera. The exposes an event which informs subscribed event handlers when a video frame is available for processing. The following code snippet shows the code implemented in setting up the video format.

private void SetupSensorVideoInput() 
{ 
    if (kinectSensor != null) 
    { 
         imageFormat = (ColorImageFormat)cmbDisplayMode.SelectedItem; 
         kinectSensor.ColorStream.Enable(imageFormat);     

kinectSensor.ColorFrameReady += new EventHandler<ColorImageFrameReadyEventArgs>(kinectSensor_ColorFrameReady);
kinectSensor.Start(); } }

Processing Video Frames

The ColorFrameReady event informs subscribed event handlers whenever a Color frame becomes available for processing.

private void kinectSensor_ColorFrameReady(object  sender, ColorImageFrameReadyEventArgs  e) 
{ 
    ColorImageFrame colorFrame = e.OpenColorImageFrame();   

if (colorFrame == null) { return; }
Bitmap bitmapFrame = ColorImageFrameToBitmap(colorFrame); picVideoDisplay.Image = bitmapFrame; }
private static Bitmap ColorImageFrameToBitmap(ColorImageFrame colorFrame) { byte[] pixelBuffer = new byte[colorFrame.PixelDataLength]; colorFrame.CopyPixelDataTo(pixelBuffer);
Bitmap bitmapFrame = new Bitmap(colorFrame.Width, colorFrame.Height, PixelFormat.Format32bppRgb);
BitmapData bitmapData = bitmapFrame.LockBits(new Rectangle(0, 0, colorFrame.Width, colorFrame.Height), ImageLockMode.WriteOnly, bitmapFrame.PixelFormat);
IntPtr intPointer = bitmapData.Scan0; Marshal.Copy(pixelBuffer, 0, intPointer, colorFrame.PixelDataLength);
bitmapFrame.UnlockBits(bitmapData);
return bitmapFrame; }

The event handler parameters provides access to a ColorImageFrame object. Before the video frame can be displayed the ColorImageFrame object first needs to be converted to a memory Bitmap, which can then be displayed by the Form’s PictureBox. Notice the ColorImageFrameToBitmap method, it functions by extracting data from the ColorImageFrame as a array, then creates a new memory Bitmap and copies the array of data.

Deactivating a sensor

Earlier when we activated the sensor we deactivated the active sensor. Listed below is the relevant code snippet.

private void DeActivateSensor() 
{ 
    if (kinectSensor != null) 
    { 
        kinectSensor.Stop(); 

kinectSensor.ColorFrameReady -= new EventHandler<ColorImageFrameReadyEventArgs> (kinectSensor_ColorFrameReady);
kinectSensor.Dispose(); } }

Dewald Esterhuizen

Blog Stats

  • 869,810 hits

Enter your email address to follow and receive notifications of new posts by email.

Join 228 other subscribers

Archives

RSS SoftwareByDefault on MSDN

  • An error has occurred; the feed is probably down. Try again later.