This code sample intends to illustrate how to create Windows Forms Applications that do not have a square/rectangular border.

You can download the full sourcecode at codeplex:
http://nonstandardforms.codeplex.com/
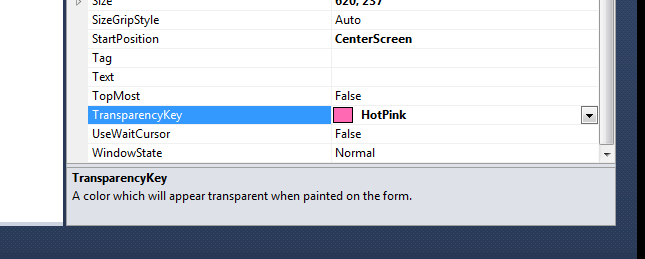
The crux of this sample can be defined as being able to manipulate a Windows Form’s TransparencyKey property. Notice how I set the value to the named Color ‘HotPink’
In order to control the way in which the Form gets drawn to screen I assign an event handler to the Form’s Paint event.

Inside the Form’s paint event handler I call different drawing functions based on which radio button has been checked. The general logic behind the drawing code remains the same.
Let’s have a look at the function that creates the effect of square chipped out corners:
private void DrawSquareChippedCorners(Graphics graphics)
{
int rectLenght = 25;
SolidBrush brush = new SolidBrush (this .TransparencyKey);
//Top Left Corner
graphics.FillRectangle(brush, new Rectangle (0, 0, rectLenght, rectLenght));
//Bottom Left Corner
graphics.FillRectangle(brush, new Rectangle (0, this .Height - rectLenght, rectLenght, rectLenght));
//Top Right Corner
graphics.FillRectangle(brush, new Rectangle (this .Width - rectLenght, 0, rectLenght, rectLenght));
//Bottom Right Corner
graphics.FillRectangle(brush, new Rectangle (this .Width - rectLenght, this .Height - rectLenght, rectLenght, rectLenght));
}
The TransparencyKey property of a Windows Form provides a mechanism to completely prevent just one Color from ever being painted by the Form. Said in other words, you get to choose one Color and be guaranteed that instead of painting that specific Color the Form will paint nothing, which will most likely result in some level of transparency, hence the property name TransparencyKey. To take advantage of this feature where I do not want the Form to paint, I explicitly perform paint operations using the same Color specified as the TransparencyKey.
Painting with the Color set to Transparent will not cause any visible change. Painting with the TransparencyKey Color has the end result of being an eraser. In this function I simply draw a filled rectangle on each corner of the form.
Next up is the function that ‘snips’ off each corner at a 45 degree angle, basically drawing triangles of which two sides join at a 90 degree angle:
private void DrawTriangleChippedCorners(Graphics graphics)
{
int triangleLenght = 25;
SolidBrush brush = new SolidBrush (this .TransparencyKey);
//Top Left Corner
graphics.FillPolygon(brush, new Point [] { new Point (0, 0), new Point (triangleLenght, 0), new Point (0, triangleLenght) });
//Bottom Left Corner
graphics.FillPolygon(brush, new Point [] { new Point (0, this .Height), new Point (triangleLenght, this .Height), new Point (0, this .Height - triangleLenght) });
//Top Right Corner
graphics.FillPolygon(brush, new Point [] { new Point (this .Width, 0), new Point (this .Width - triangleLenght, 0), new Point (this .Width, triangleLenght) });
//Bottom Right Corner
graphics.FillPolygon(brush, new Point [] { new Point (this .Width, this .Height), new Point (this .Width - triangleLenght, this .Height), new Point (this .Width, this .Height - triangleLenght) });
}
Windows Forms GDI+ does not have native ‘DrawTriangle()’ function. But the desired effect can be achieved by drawing three pointed polygons.
Lastly we look at the function responsible for drawing rounded corners.
private void DrawRoundedCorners(Graphics graphics)
{
int pieRadius = (rdRoundedCorners.Checked == true ? 100 : this .Height);
int rectLenght = pieRadius / 2;
SolidBrush brushTransparencyKey = new SolidBrush (this .TransparencyKey);
SolidBrush brushBackground = new SolidBrush (this .BackColor);
graphics.FillRectangle(brushTransparencyKey, new Rectangle (0, 0, rectLenght, rectLenght));
graphics.FillPie(brushBackground, new Rectangle (0, 0, pieRadius, pieRadius), 180, 90);
graphics.FillRectangle(brushTransparencyKey, new Rectangle (0, this .Height - rectLenght, rectLenght, rectLenght));
graphics.FillPie(brushBackground, new Rectangle (0, this .Height - pieRadius, pieRadius, pieRadius), 90, 90);
graphics.FillRectangle(brushTransparencyKey, new Rectangle (this .Width - rectLenght, 0, rectLenght, rectLenght));
graphics.FillPie(brushBackground, new Rectangle (this .Width-pieRadius, 0, pieRadius, pieRadius), 270, 90);
graphics.FillRectangle(brushTransparencyKey, new Rectangle (this .Width - rectLenght, this .Height - rectLenght, rectLenght, rectLenght));
graphics.FillPie(brushBackground, new Rectangle (this .Width - pieRadius, this .Height - pieRadius, pieRadius, pieRadius), 0, 90);
}
This function works slightly different to the other two functions. In short the logic is as follows: The same as previously I ‘cut/erase’ a square from each corner. Next I join the two sides of the Form by drawing a 90 degree Pie shape in the same Color as the Form Background Color. The Pie shape’s radius determines how rounded the corners are drawn. If the corners become rounded to the extent of the top and bottom curves intersecting it creates the appearance of a Form with two semi-circle shaped sides.
If you have any questions or suggestions feel free to post a comment or you can reach me via twitter @DefaultSoftware. If you have a more efficient method please do share.


Admiring the time and effort you put into your site and detailed information you offer.
It’s great to come across a blog every once in a while that isn’t the same
old rehashed information. Excellent read! I’ve bookmarked your site and I’m including your RSS feeds to my Google account.